Top 5 Coolest Features of SharePoint 2013 Workflows
16 May 2014
I have been digging into SharePoint 2013 quite a bit recently and must say, as an application developer, I am really quite impressed with how the platform has matured. Gone are the days where you need access to “special folders” or have to develop custom Web Parts to build in added functionality. When we talk about SharePoint with clients, we talk a lot about out-of-box functionality versus custom development - the implication being that developing custom controls and adding them to SharePoint is more time intensive than developing, say, a user control for an ASP.NET application. This is no longer the case. I am especially impressed with the improvements to the Workflow functionality provided by SharePoint 2013.
Workflows in SharePoint are a job or a series of jobs or tasks that perform some action. Workflows are triggered manually or in response to a site or list event. Workflows are most useful in automating existing conceptual or manual work processes. They are very powerful.
As an example, one of the most common workflows in SharePoint is the approval workflow. It works like this:
- Someone makes a change to a content item.
- Once saved or published, the approval workflow is triggered.
- The approval workflow automatically notifies a designated approver that there is an item needing approval.
- The approver approves the content and then the content is published live

These are some of the features of SharePoint 2013 workflows I find to be most exciting:
#1 - Web services
That’s right! Now you can call web services right from a workflow. This allows you to integrate disparate systems and centralize where data is managed. For example, you can pull in data from third-party external websites that may not be running SharePoint, and work with the data on your SharePoint intranet site. When you’re finished, it can be posted back to the external sites. You can also update a contact list in SharePoint and have the changes populate into your CRM system.
#2 – Loops
Looping is very powerful. You can design the workflow to run a set of actions a specific number of times or until certain condition is met. With the ability to set variables, this becomes extremely useful. Say I want to delete all documents in a document library that were approved by a certain user. I could set up a loop to open each folder in the library. Then I could set up another loop to look through each file in the current folder. By examining the document properties of each file, I could determine whether or not to delete a specific file.
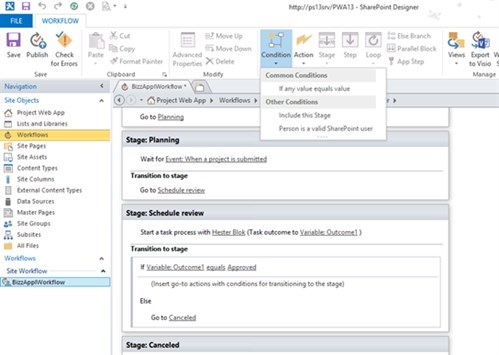
#3 – Stages
Stages serve two purposes:
- Visually organize a related set of actions.
- Control program flow.
You can organize your actions into discrete “functions” and then call them from other stages. For example, I could develop a workflow that sends an email to all employees and customers. The employees email will contain different data than the customer email. I would set up a workflow containing two stages: SendEmployeeEmail and SendCustomerEmail. Then, using our handy loop on a list of recipients, I could then use an “If” statement to check whether the contact is an employee or a customer. If the contact is an employee, I use the special workflow command, “Go To” and tell the workflow to Go To SendEmployeeEmail, otherwise I tell it to Go To SendCustomerEmail.
#4 – Pausing (!!)
Pausing allows a workflow to stop execution for a specific duration. You can pause for a minute, an hour or a day, or pause until a specific date. I have a workflow that finds broken site links and then sends an email. I then programmed it to call a second workflow whose only purpose is to wait a week before calling the first workflow again, therefore generating a weekly email. And just like that we can have simple scheduled tasks in SharePoint.
#5 - Visual Designer
There are a number of ways that you can create SharePoint workflows. In past versions of SharePoint, we created text-based workflows by typing or adding from a list of defined conditions and actions. Now, you can develop workflows using Visio by dragging shapes onto the drawing and setting a few properties. There is an added benefit of being able to share these workflow diagrams with people who are visual learners and don’t get much out of reading through pseudo code.
Before you assume that SharePoint doesn’t support a feature or capability that you need, check out the SharePoint 2013 feature list. For a more detailed look at the new SharePoint platform, check out these links:

